Monday, October 31, 2011

Halloween Ideas

If you know me well enough, you'll know that Halloween is one of my favorite holidays!! I love dressing up, eating free candy, and decorating-- so a holiday that allows me to do all of the above is just fabulous. I thought I'd share some fun Halloween crafts I've found, but just don't have the time, energy, (or money!) to make. Try them on you're own, and let me know how they turn out!

Glue buttons on a pumpkin for a cleaner alternative to carving. (It will also last longer than a carved pumpkin.)

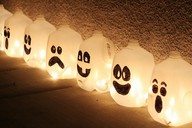
Rather than immediately recycling milk gallons, save them and make a fun walk way for trick-or-treaters.  It looks as if these "ghosts" are lit with christmas tree lights. 

These candy-corn sugar cookies are so easy to make!! Divide your sugar cookie dough into thirds: keeping one third the natural "sugar cookie" color, dying the second third orange, and dying the final third yellow. Roll the colors out into a rectangle, and stack each of the colors on top of one another. Next, slice your "candy-corn Neapolitan" cookie rectangle and cut it up into individual triangle shaped cookies. 

Glue googalie eyes of all different sizes onto a frame and add ribbon and letter embellishments. 

Found this idea from the website of the domestic goddess: Martha Stewart. Use half of a pumpkin as a bird feeder. 

Last, but not least, Lilly Pulitzer inspired pumpkins! Cutest idea I've seen to incorporate a little pink and green for Halloween!

Saturday, October 29, 2011

Rice Krispie Treat Cake

I almost forgot about the fun cake Rachel and I made for Lauren's birthday!! Lauren doesn't really like cake, but she does like Rice Krispies. We wanted to do something a little more fun than just Rice Krispie squares, so we made a tiered Rice Krispie "cake"! It was so easy-- just pour your Rice Krispies into round baking pans and stack them on top of one another. We used some icing to attach Mike and Ikes, but you could also attach fun cereal like Trix to make a colorful border. 

Make-Up Organization

Hi again!

Okay, so if you are anything like me, you have a bottomless bag full of makeup that you have to literally dig through to find anything. I wanted a way where I could organize my makeup, but avoid having to buy a glorified Caboodle from an expensive makeup store. I also wanted something that would allow me to keep my makeup out at all times (while still being cute and organized) since I tend to get lazy putting away something I use everyday.

Look how brilliant this idea is:

Awesome right?! It was SO simple to make and SO cheap too!! (Not including the price of the makeup-- that can add up pretty fast!)


I started this project by purchasing a cookie sheet from Walmart. You can get a flattened cookie sheet if you want something a little different, but I went with the cheap route, and bought a cookie sheet with edges for $3.50. The cookie sheet is magnetic, so if you glue a magnet to each makeup item, they'll magnetically attach and stay there!

I took a scrap of fabric I had lying around and glued it to the back of the cookie sheet. The trick to gluing the fabric on the baking sheet is to only apply the glue to the back of the baking sheet and stretching the fabric as far as it will go so that it wont sag. (Sorry I don't have any pictures of the assembly of this craft project, I did it before I was expecting to make a blog.)

Start from the top most side on the back of the baking sheet and apply hot glue. Press your fabric so that it gets glued down well. Wait for the glue to cool and make sure the fabric is firmly attached. You may want to apply more glue if you didn't use enough before.

(If you just applied glued the top side of the sheet, now you'll want to apply the glue to the very bottom section.)

On the opposite side of where you just glued the fabric down, and pull the fabric taut. You want to stretch the fabric as far as it will go. Keeping the fabric taught, apply glue and attach the fabric like you did before. Repeat same steps as before for the sides of the pan, making sure to keep the fabric taught.


I added a little loop of ribbon so that the cookie sheet could hang from the wall. 


Now that you have your cookie sheet covered you're ready to go onto the next step.


You'll want to hot glue magnets on the back of each of your make up items. Make sure you buy REALLY strong magnets or glue multiple weak ones on the back. (I've ruined two Mac eyeshadows because they fell to the floor.) You may be saving a little bit of money in the short term by buying cheap magnets, but if your makeup falls to the floor, it will break and you'll have to replace it.

Once you've applied the magnets to the back of your makeup, you can simply stick them to the cookie sheet! Your makeup will be attached to the magnetic cookie sheet until you need it!

You can also put some magnets on a small cup so that your makeup brushes will be on there too. My cookie sheet was too small to fit all of my makeup and a cup for brushes, but if you have a big enough cookie sheet, go and attach a cup for your mascara, concealer, and brushes.

Monogramed Canvas

Okay, so yesterday was my friend's birthday, and I was trying to think of a perfect gift for her that wouldn't break the bank for me. She had mentioned before that she loved the canvases I've painted in the past, so I thought it would be a great idea to paint her a little something with her monogram on it!


First, I shopped around for a cheap canvas. I found one for about two dollars at one of those cringe worthy super discount stores. I used to turn my nose up stores like this one, but they had some great deals on canvases, so maybe I'll be visiting them more now!

I started by painting the canvas a pretty shade of blue. I thought blue would go well with the interior of the birthday girl's (Lauren) room. (Hindsight bias, it would be easier to have painted the canvas white first, so I wouldn't have to add so many coats of a lighter paint onto a dark background. I used up quite a bit of white paint to cover up the blue.)

Next, I made a zig-zag pattern stencil with a piece of card-stock, so that I would know where to apply my paint later. Making the stencil probably took up more time than the whole project itself! I have never been good with shapes and patterns (or any type of math for that matter) so it took me forever to make the zig zag right!


I had to retouch a couple of areas-- at first I didn't trace the outline onto the canvas, and instead painted directly on top of it. I found that the paint was able to seep under the stencil and make my lines messy rather than the crisp lines I was hoping for. Definitely trace around the stencil lightly with a pencil, you'll be able to have more control of the paint if you do. 


Once I had finished the background and ensured there were no pencil marks or paint smears visible, I moved onto the next step: the monogram. (Remember!!! a monogram takes the first letter of a person's: FIRST, LAST, MIDDLE names!) I've seen my share of weird monograms-- keep in mind a traditional monogram reads left to right, with the first name's initial on the far left, the middle name's initial on the far right, and the last name's initial in the middle. The last name's initial in the middle is typically larger that the other initials, but it's up to you if you want to make it bigger and stand out.

Okay, here's a secret I've learned how to always make a perfect monogram! Ready? First, type up on Microsoft Word whatever you want on the canvas and print it out. You can choose whatever font you'd like-- for this project, I went with a simple Times New Roman. I thought that a structured font would go along nicely with the angled pattern. I printed the: "L" in size 500 font, and the "A" in size 600 font. You can choose whatever size font you would like really, I thought that the 500 and 600 sizes fit well on the canvas, and allowed me to have a slightly larger initial in the middle, which is typical of a monogram. 

Next, You'll have to cut around each of the letters in your monogram. You want to ensure it will fit on the canvas, but you'll also want to make sure you have enough white paper around each letter 


Once you've figured out if you like the size and font of the letters, you'll want to get a small pin. (I couldn't find my sewing kit, so I had to improvise with one of those "button pins".


Next, you take your pin and punch small holes all around the outline of each letter. Luckily for me, Lauren has two: "L's" in her monogram, so I was able to save time by only having to punch around two letters. 


You'll want to space each hole pretty close, because later, they'll be your template for where you're going to be painting over. 

Once you've punched out an outline for each letter, you are going to want to tape it down where you want it on your canvas.  I find that it's easiest to work from the middle and work your way outward to ensure even spacing. I started with the: "A".

Next, you're going to color over your pin pricks with a marker. I was going to color in each letter red, so I chose a red marker to color in the holes of my image. 

The color from the marker will go through the holes you pricked on the image, and give you an outline of the lines you need to paint through later. (Unfortunately, you'll find if you didn't pin prick close enough to the outline of your letter, your marker will color over any stragglers and make your monogram a little wonky.) 
Once you've finished coloring over each pin hole on your image, you'll be able to see a faint outline of where you need to paint later. 

You'll repeat these steps for your other two letters in the monogram, and Voila! You'll have a very cute and extremely neat monogram! Cute right? 


Have fun creating your own monogrammed canvas! If follow my trick of printing out letters and using their outline as a stencil, you'll make a much more clean and even looking letter than if you were to: "free hand" it.

First Post

Hi everyone! This is my first time dealing with any type of blog or website so please bear with me as I iron out the kinks!! I decided to create a blog dedicated to crafting after a friend mentioned it would be a fun way for me to share my ideas and crafts with my friends and loved ones.

Let me start by first saying that I LOVE to craft and get creative! I actually have a walk in closet housing all my baking and crafting supplies-- (lucky right?! what college dorm room has two HUGE walk in closets?!) I love to creep on crafting blogs and save ideas to my computer's desktop, and I would go extreme coupon-ing at Michael's Craft Stores if they would get rid of that pesky: "one coupon, per customer, per day" rule they have. 

I'm a bit embarrassed to admit I probably spend more time crafting than I do studying! (I wish Sweet Briar College will one day offer a major in Arts and Crafts--wouldn't that be fabulous? I'd probably have earned my doctorate by now.)  Anyways, keep checking back here as I start uploading more and more fun craft projects!